

Thank you for your order of "My Favorite April Activities." I have included things for April Fool, Spring, Easter, Earth Day, several activities for studying plants and lots of other fun things. I hope that you enjoy using them as much as I have over the years. These ideas are intended for your classroom only. Please let me know if you have any questions, or I can help you in any way.
****Please note that these files are optimized for Adobe Reader version 7 or newer. You may be unable to print correctly if you have an older version of this program. This program is free at the following link.
![]()

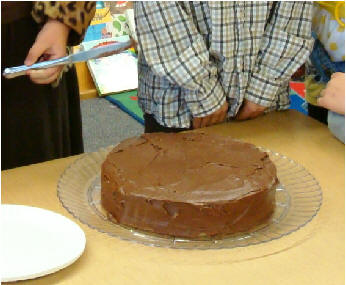
 Start the month off with
this fun April Fool activity! I make a "FAKE CAKE"
using foam type rubber! I always make a real cake
that the kids can enjoy after the joke is played.
But, this is a fun trick that always fools the kids.
The parents and kids talk about it for a long time after
April Fool's Day, too. I have played it for many
years and it never fails to be a fun day--- the kids love
it!
Start the month off with
this fun April Fool activity! I make a "FAKE CAKE"
using foam type rubber! I always make a real cake
that the kids can enjoy after the joke is played.
But, this is a fun trick that always fools the kids.
The parents and kids talk about it for a long time after
April Fool's Day, too. I have played it for many
years and it never fails to be a fun day--- the kids love
it!
I purchase a sheet of foam type rubber at Joanne's, Michael's or any craft/fabric type store. The foam is the type that you would use to upholster. The thickness doesn't have to be exact. But, I usually find it approximately 1 - 1½ thickness. You can also purchase a foam pillow form, but they are usually thicker than you need. You could probably purchase just one pillow form that is a couple of inches thick. If you purchase a sheet, it will need to be large enough to cut two 10 inch circles. I use a dinner plate for a pattern. I trace around the plate and cut out the circles. You might find a knife easier to cut, but be careful! The foam doesn't have to be perfect since you will be covering it with frosting.
 Frosting:
You can use a cake plate or cover a piece of cardboard with
aluminum foil to put the cake on. I used a cheap,
plastic cake plate from the dollar store. You will need one
or two cans of frosting---any flavor. I put a dab of
frosting on the bottom of the cake to help hold the cake in
place. Then I frost the bottom layer of the cake.
Put the top layer on the cake and frost all over.
Frosting:
You can use a cake plate or cover a piece of cardboard with
aluminum foil to put the cake on. I used a cheap,
plastic cake plate from the dollar store. You will need one
or two cans of frosting---any flavor. I put a dab of
frosting on the bottom of the cake to help hold the cake in
place. Then I frost the bottom layer of the cake.
Put the top layer on the cake and frost all over.
I leave the cake out for the kids to see when they first arrive at school. They are really excited about CAKE! YEAH! Then I give one student a table (NOT sharp) knife to attempt to cut the cake. When they can't cut through the cake, I ask someone else to help them. After several students attempt, I say: APRIL FOOL! They all laugh. Then I bring out the cake or cupcakes that have been hidden. I don't think it would be too funny if there wasn't any treat!
***After the kids are finished with the joke, I take the cake to the teacher's lounge. The teachers are FOOLED, too! This is a joke that can be played over and over if you save a bit of frosting to touch it up after each attempt to cut it.
April
Calendar

Children trace numbers on the April calendar. I have provided two calendars. One is with some dotted lined numbers for those students needing help in writing numbers. The second only has the first and the last number. I have found that it helps to give students these to make sure they start and end in the correct place.
April Calendar --Blank PDF file
Spring Bingo

Bingo is a great game to play for developing listening skills, vocabulary building and small motor skills. The children cut out the pictures and glue all of the pieces in random squares on the Bingo blank playing card (grid.) Each child's card is unique since they are all placed randomly. This prevents too many winners at once.
I cut out a set of pictures to use for playing the game and put all of them in a little box to draw out the pictures for playing. I have the students keep their Bingo cards in their cubby for playing when we have a few minutes throughout the month of April. If you don't have cubbies, you can collect the cards each time you play. I have found poker chips work well for markers. Or, you can cut small squares of paper for the students to use to cover their pictures. We usually give stickers or some small prize for the winners. This can also be played throughout the spring!
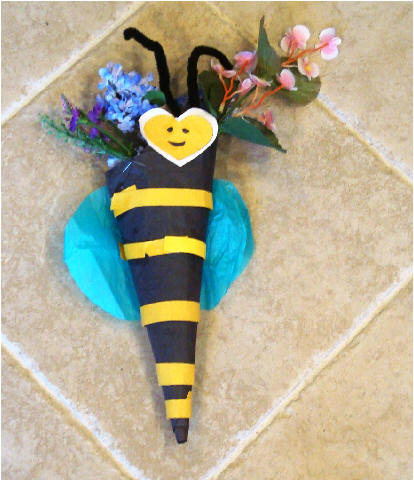
Spring Bee Basket
 These
little bumble bees were so cute all displayed on our spring bulletin
board. They would also work as a May Day basket to hold flowers.
These
little bumble bees were so cute all displayed on our spring bulletin
board. They would also work as a May Day basket to hold flowers.
Materials needed to make the bee:
Black, yellow and white
construction paper
Black pipe cleaner
Flowers for inside the cone
Glue
1. I have an adult cut the body pattern. You just need to round the corners at the top of the black construction paper to make the cone. I staple the top and add a little bit of transparent tape to hold the cone. The tape will be covered when the yellow stripes are added. I use the seam side for the back of the bee.
3. Staple one 12 inch black pipe cleaner to the front side of the bee. The seam of the body is the back of the bee. The staple is covered on the front side of the bee's face with the bee's face.
4. Students cut out the yellow and white hearts for the face. The eyes and mouth can be drawn on the yellow heart with black crayon. Glue the yellow heart to the larger, white heart. Then glue both hearts on the front of the cone body over the staple. I
5. I cut strips of yellow construction paper 12 x ½ inch. These strips can be cut to fit around the bee's body. The students cut their own strips to the length that they need and glued these down on the back of the bee's body.
6. Wings can be any colored tissue paper. You can have one or two sets of wings to attach to the back of the bee. I used two in the sample shown. Just a dot of glue in the middle of the wing is needed to hold in place on the back of the bee.
7. I stuffed a little bit of tissue paper in the bottom of the cone to hold the flowers. The stem of the flower can be dipped in glue and put inside the cone. I purchase flowers at the Dollar Store for this project. Or, you can ask for donations from parents.
The Runaway Bunny

This is a great follow-up activity after reading "The Runaway Bunny." We discuss where we might run if we were the bunny. This is also a good time to discuss why the apostrophe is added to the name in this sentence. A cotton ball is added for the bunny's tail.
Bunny Writing Paper and Book Cover PDF file
Bunny Hat


The hardest part of making the bunny hat is making the pattern. I have done my best to show you how to make the pattern with pictures.

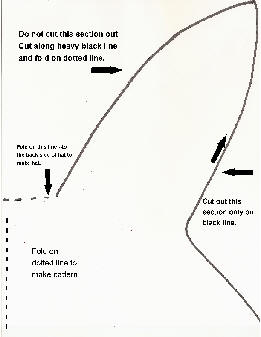
Print pattern on regular 8 ½ x 11 inch paper. Place pattern on a piece of 12x18 sheet of construction paper following directions on pattern. Please see photo for correct placement of pattern. ***Note fold is on the right side of photo in the top photo. Trace lines on 12x18 piece of construction paper.
You can use any color to make the ears. I used pastel pink and blue.
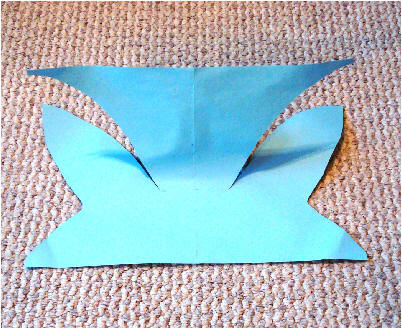
The sides of the hat are the only parts that are cut off. The back section is cut on the line and then folded on the short dotted line in the center of the hat. This section is not removed! This section is left to tuck behind and staple. See photo for how to cut. (I have raised the back section to show where to cut.)

Fold the top part of the hat that is shown on the blue hat to the back side on the short dotted line. Then, turn the sides to the back and staple as shown in the next picture (staple on the back.)
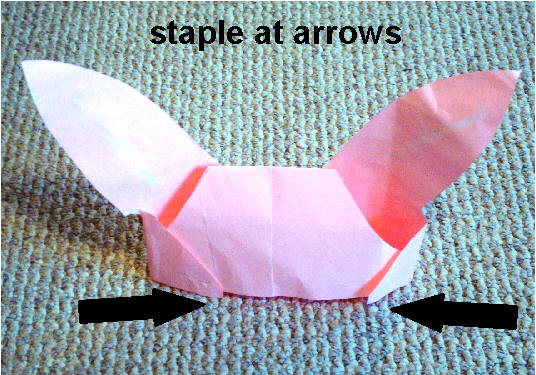
I
staple the hat to fit each child's head. You can make
it smaller by lapping it a bit more in the back.
Children can put cotton or polyester batting on the ears.
If too much cotton is used, the ears will flop down.
Some of the children liked to wear the hat backwards as a
"floppy-eared" bunny. They were both cute!
Spring Lambs


Copy handprint patterns on black construction paper or trace each student's hand. I was surprised to find that you can see the black lines on the black construction paper! Children cut out the pattern on the lines. I use plastic coffee can lids for the white glue. After the glue dries, it can easily be peeled off---NO washing! Glue is applied only to the palm area of the handprint. The fingers and thumb are left without glue for head and legs. I use the handi-wipes to have children wipe ALL of the glue off of fingers before using the cotton balls---otherwise, it is huge mess with cotton sticking to the fingers! Using a white crayon, put an eye on thumb part of the handprint. A small ribbon bow is attached to the lamb. Or, you may use the paper bow pattern and copy on colored construction paper.
Lamb Handprint and Bow Pattern PDF file
Pussy Willow Art

I used a 12 x 18 inch - pale blue construction paper as a background for this project. I have provided four different vase patterns, but you might like to have students make their own vase.
Glue vase at the bottom of the paper. Using a brown crayon, make long stems. I have sometimes had to limit the number of stems to avoid students making too many. Also, I stress making the stems long or they would make short stubby stems. It's nice to have a picture of a real or silk pussy-willow for those students who are not familiar with this flower. I usually find it helpful to have a sample of the project, too.
Paint: I mix white tempera paint with just a couple of drops of black to make a very light gray color for the blossoms (dots.) Students use their finger to put dots on both sides of each stems. After the paint has dried, we used a small piece of cotton pulled from a cotton ball to make a bud. Then they roll it into a little ball for a bud. These were applied on top of the gray dots of paints. The cotton buds are optional. The project works well without the cotton. You can use only the gray paint, too. Your choice!
Patterned Egg Homework

I copy the blank egg pattern in spring colors. Each child chooses the color of the egg that he/she would like to decorate. A letter is attached to the egg for the parents to explain the activity. This is a sample of an egg that was completed with puffy paint. We received lots of very creative eggs using many different types of materials to decorate.
Egg Pattern and Letter to Parents PDF file

Bunny and Duck Picture-Poem
 This is
a fun little bunny/duck that has a
little poem to go along with the activity. If you
turn the picture one way, it looks like a duck. Then, if
you turn it the other way, it looks like a duck!
This is
a fun little bunny/duck that has a
little poem to go along with the activity. If you
turn the picture one way, it looks like a duck. Then, if
you turn it the other way, it looks like a duck!
Copy one of the bunny/duck pattern on white construction paper for the bunny and another one on yellow construction paper for the duck. Students cut out both pieces and glue them back-to-back. Copy the poems and glue the bunny poem on the bunny side and glue the duck poem on the duck side. The poems are marked with a picture to avoid confusion on which side to place each poem.
I like to write the poem on a small chart and practice tracking the words to the poem with the class in small and large groups.
Bunny and Duck Pattern with Poem PDF file
My Little Seed Book

Copy and collate the five pages to the little book. I make a sentence strip for each page and add an illustration. I put these strips in a chart rack to read in a large group setting prior to making the book in a small group. We track the words with a large pointer. I also let the students use the pointer during free choice activity time. They like using the pointer, and it is a great way to reinforce tracking when learning to read!
Parts of a Seed Diagram

Copy both pages of the seed diagram on white construction or drawing paper. We make the diagram after we have read several different books about plants and seeds. (You might like to make a sample prior to doing the activity with the students.)
I purchase a bag of dried, lima beans in the grocery store. I soak enough beans in a bowl of water for each student to have a lima bean. You will need to soak the beans several hours or overnight. Then in class we talk about what is inside every seed. I tell the students that there is a surprise inside every seed! Then I show them a dried lima bean and try to open the bean. it is very hard to open it without soaking! Then I show them a bean that has been soaked. After soaking, the bean's seed coat is all wrinkly and will be easy to remove. You should be able to peel the seed coat off of the seed. You can see the root and the leaves inside the bean by opening up the bean. The kids are always amazed. It's also fun to check other seeds to see if you can find the same parts inside!
Students color the seed and parts of the seed with light green-yellow crayon. Cut out all of the parts. Students might need some help to poke a tiny hole in each of the parts. I used a brad (paper fastener) to put the parts of the seed together with the root and leaf on the inside at dot---between the front and back of the seed. See photo above.
Lima Bean Book

This is a great follow-up activity
to go along with the above diagram of the lima bean seed.
It is written in a Brown Bear format to tell how a seed goes from
seed to bean plant.
Copy each of the pages and collate books. The story can be written on a chart or sentence strips to review with students before completing the books.
Rain Book


I find it helpful to put each
sentence of the book on a sentence strip to read with the whole
group. Each page has the high frequency word "the" added. I draw a picture for each sentence to assist the
students with visual clues. We use a pointer to practice
tracking the words.
In small groups, we practice writing the word "the" on each page
and then reading each page.
Parts of a Flower Paper Bag Project

 Copy
the diagram worksheet on regular copy paper. Students can
color the flower and write the names for the parts of the flower
on the lines. The bottom of the paper bag (flap) is colored
green to represent the grass (see photo on left.) After cutting out the diagram
on the outside lines, the diagram is glued on a brown paper
(lunch size) bag. Place the dotted line where the flap of
the bag folds up. When the flap is up, the roots should be
hidden.
Copy
the diagram worksheet on regular copy paper. Students can
color the flower and write the names for the parts of the flower
on the lines. The bottom of the paper bag (flap) is colored
green to represent the grass (see photo on left.) After cutting out the diagram
on the outside lines, the diagram is glued on a brown paper
(lunch size) bag. Place the dotted line where the flap of
the bag folds up. When the flap is up, the roots should be
hidden.
Plant Bulletin Board
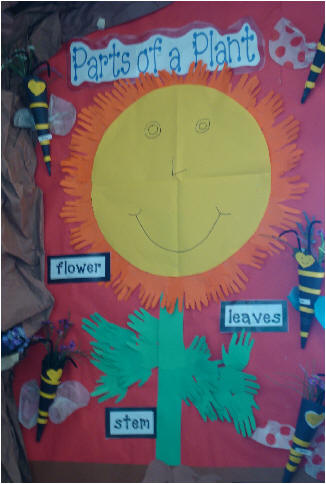

I have given two different bulletin boards that were done different years. Each one is a little different. Note: one has brown paper at the bottom for the soil. The photo above doesn't have the soil. I have also given the banner and little signs for the parts of the plant in PDF files.
To make the flower --cut a large circle. I fold a large piece of yellow butcher paper (bulletin board paper) in fourths. See diagram at left. You can choose the size of the circle that you would like to fit the size of your bulletin board. A happy face was drawn on the circle---optional!
For the stem, I used a piece of green construction paper that was approximately 18 inches x 4 inches.
For the soil, I used a piece of brown butcher paper the same size as the width of the bulletin board.
Copy handprints in the following colors:
Orange construction for flower petals.
Green construction paper for the leaves.
Brown construction paper for the roots.
Titles: Print one copy of the titles and cut out on lines. I mounted the titles on a piece of colored construction paper.
Banner: Print one copy of the banner. You will need to put the pieces together. I tape the pieces together and then cut around the title ( bubble around the words.) Then I mounted this title on a larger piece of contrasting color construction paper. Then I bubbled around this colored paper. I always laminate banners for using several years. See photo above.
Plant Handprint, Titles and Banner PDF file
Easter Cards

This Easter card was made on 9x12 colored, construction paper. I had an adult trace each child's hand on white drawing or construction paper. The thumb is not traced. The index finger and the pinkie were folded down and glued in the center of the palm area of the handprint. This leaves the other two fingers for the bunny's ears. A face was drawn with crayon. Each child added a message inside.
Ducky Easter Card

Copy the duck's egg shaped body on yellow construction paper. You can trace each child's hand for the two handprints needed for wings, or use the pattern I have given. The eyes, beak and feet are also given in PDF files. We glued a bit of Easter grass at the bottom for fun!
Bunny Treat Bag
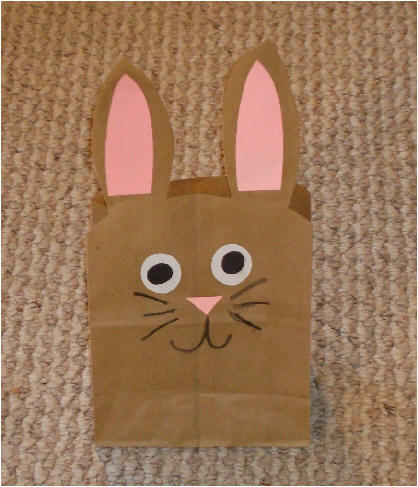
Kids love making these fun little Bunny treat bags for Spring. We use them for our Easter party bags. You can use lunch size bags, or adjust the pattern with longer ears if you are using a larger size bag.
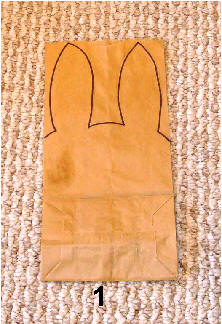
I have an adult cut out the bunny bags prior to using them in class.
Using the pattern as a template, trace the pattern on the top of the paper bag as shown in the first photo. Cut on the lines drawn through all layers of the bag.
When opened, the bag should look like the bag in the second photo.
Cut across the inside area of the bag, as shown in Photo #3. This will leave a set of ears for the front and back.
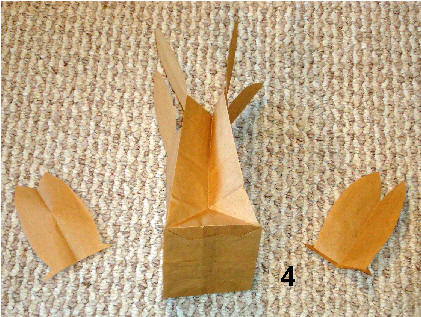
Photo #4 shows the extra, inside flap after making the cut. Throw away the inside area that has been cut.
Photo #5 shows the back view of the bunny bag with a cotton ball tail.
Directions:
Copy eyes, nose and inner ear on construction paper. Students cut out and glue pieces in place. Black crayon was used for whiskers and mouth. Easter grass can be used inside. These make great treat bags for Spring/Easter parties and they also good for holding eggs for an egg hunt.
Spring Egg Book
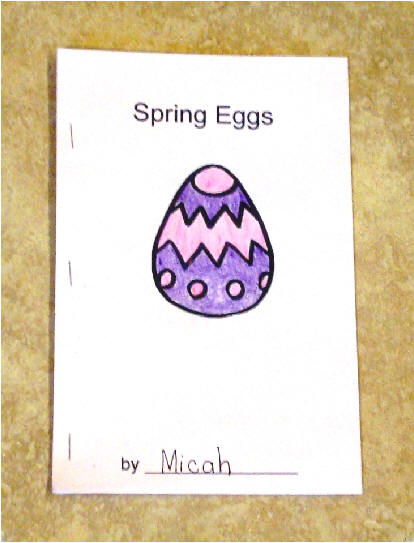
Copy and collate each of the pages for each student. The word "is" is missing in each of the sentence. If you haven't introduced this word, this is a great time to do "IS!" I put all of the sentences on sentence strips prior to doing the project in small groups --- stress the word "IS." I use the chart rack for the strips and add a picture for the visual clue on each strip. Then we track the words in each sentence with the large pointer. I cut up one of the books for the pictures. We count the number of times the word "is" is used in the story. It's also fun to leave the sentences in the chart rack for students to use during "Read the Room!" Kids love to do this. They take the pointer and read everything in the room. READ, READ, READ!!
Earth Day Project


Earth Day is celebrated on April 22 each year. I like to read several books about Earth Day before doing this project. We discuss ways that we can be a responsible citizens in saving our Earth.

Copy both papers on regular copy paper. Students
color the globe in the heart and attach to one side of the paper bag.
The directions are cut out and glued on the other side of the bag.
3-D Daisy with Photo

This is a fun art project that is great way to use photos of students. Or, just use a contrasting circle if you don't want to use a photo for the center of the flower. NOTE----If you are using a photo, you might want to have the students use a plain (orange or any other color center circle) to make it easier for them to place the small petals. If you put the photo on first, the glue might make the ink on the photo run. I have had trouble with photo ink running and smearing if any glue touches the photographs! Just wanted to give you a "head's up!" I put the photo on last (on top of the orange colored circle)--- after all of the glue has dried.
Directions:
Copy small circle pattern on yellow construction paper. Each student will need approximately eight circles.
Stem: one ---12 x ½ inch green construction paper.
Black background paper-- 6x18 inches.
You can use a 2 inch, round photo of each student for the center circle. Or, you can use the large circle pattern that I have given and copy one orange construction paper circle for the center of each flower.
Directions.
I used black paper for the background--- 6x18 inches. We glued the stem on the black paper--near the bottom of the page to allow enough room for the flower. The leaves can then be cut out and glued on the stem. I let the student choose how many leaves on his/her flower. Then we cut out the yellow petals. Each of the smaller circles are folded in half. Glue is put on one half of the circle and put on the black construction paper around the large, center circle. Another helpful hint is to tell the students to put the small yellow circles on like a spoke on a wheel---slanted or at an angle. It's a bit difficult for them to angle the petals around the large circle---that seems to make it easier for them to place around the center.
This is also a fun door decoration or bulletin board flower. Make a large 8 inch circle for the center circle and then add smaller 5-6 inch circles for the petals. Add a large stem with large leaves cut. Very cute!!
Thanks again for purchasing the April Ideas package. Please let me know if you have any questions.
Great books for plant unit:
Books for Plant Unit
All About Seeds by Melvin Berger
Apple Pie Tree by Zoe Hall
Dandylions by Posada Mia
Flower Garden by Eve Bunting
How Do Flowers Grow by Betsy Maestro
I Am a Leaf by Jean Marzollo
Mushroom in the Rain by Mirra Ginsburg
Rain Forest Secrets by Arthur Dorro
Tiny Seed by Eric Carle
What Shall I Grow by Ray Gibson
Honey Makers by Gail Gibson
Alison's Zinnia by Anita Lobel
Pumpkin Circle by George Levenson